
So I am finally writing this article! The pond is ready and its beautiful and it took a lot longer than I planned. You know in the project plan I wrote before I started everything I said: „The soil dug out will be used for making the Hugelkultur garden beds later. Digging and lining the pond will take not more than two days.“
Let´s take a moment and appreciate this. It´s is actually very funny to read the project plan again. Because I was sitting in Thailand on a table with this beautiful view, writing about how I will proceed here. I totally get where I came from when I wrote this and I was completely wrong 🙂 Haha. This pond has been the biggest project in the garden so far. It was even more work than the hugelkulture garden beds and they where a lot of work too 🙂
So digging the pond took a while longer then I planned. It´s hard to calculate how much time it really took, because we did not work full days on it, but it was only ready after 5 weeks. And nope, we did not use the earth of the pond for the hugelkulture garden beds. Because they where already ready 🙂 There was enough earth on them.
So let´s start with the question why you would like to have a pond in your garden (even though it´s some work to do it:))?
There are so many advantages. First of all you increase the amount of plant and animal variety immensely. You build a lot of habitat and create niches for many different animals (such as birds, frogs, fish and insects). There is also the fact that the plants in the pond can provide a lot of biomass for mulching or composting. You can even plant plants that provide food not only for the animals in the pond, but also for you. The pond creates a microclimate that absorbs heat and regulates the temperature in the surrounding. So when it´s getting very hot, around the pond it will still be temperate climate. The pond is also reflecting the light from the sun, so in our case there is more light on the terrace in the evening now. If all these reasons did not convince you, maybe the beauty of a bird taking a bath in the early morning probably would do it 🙂
So now you know the reasons why I decided to build the pond. Would I do it again? Yes, but now I know how and what to plan and consider. I did not know how to do all this so I had some problems falling asleep during the phase where it was not ready…It was haunting me 🙂 Haha. I am still dreaming of it sometimes.
I would divide the process of making the pond into these phases:
Phase 1: Planning the pond
Phase 2: Digging the pond (and preferably taking care of the dug out earth simultaneously)
Phase 3: Buying the liner and lining the pond
Phase 4: Taking care of the banks of the pond
Phase 5: Planting in the pond
Okay, lets begin!
Phase 1. Planning the pond
So, before starting to actually plan the pond I would suggest to become clear of what you want from it. Do you want fish? Do you want just some beauty spot or do you want a huge wildlife habitat?
If you want to have fish, at least in temperate climate, then it needs to have a minimum depth of 0.9m to assure that the fish can hide from the ice in the winter time. What I found about the connection of depth and cross-section area is the following[1]:
– a pond between 3 – 5 m^2 needs to have one area that is at least 80cm deep
– a pond between 5 – 15 m^2 needs to be between 90 to 100cm deep
– a pond bigger than 15 m^2 can be deeper than 100cm
When you plan the size, form and depth of the pond, make sure there are no pipes in the same place. We did know there was one pipe and planned around it. But then there was another pipe 🙂 So we responded to that change while digging. It´s good though to know these things before you start. And also remember that the more fancy the form of the pond, the harder is the lining and the more off cut of the foil will be left. I had to learn that myself.


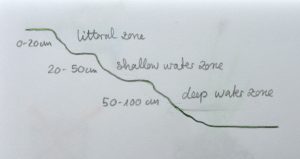
As different plants need different water depth it is a good choice to plan zones varying in depth. We built three zones. A littoral zone with about 0 – 20 cm, a shallow water zone from 20 to 50 cm and a deep water zone from 50 cm to one meter. Because of limited space and limited experience we built the transition between each zone very steep. Thats not necessarily bad, but it is more natural to have a more gentle transition between each zone. You can build more then three zones or less depending on the size of the pond, the plants you want to plant and the animals you want to create habitat for.

Another fact that you might want to consider is how much money you want to spend for the pond. There are different options of lining. They cost different amounts of money and endure different amounts of time. I only gained experience now in lining the pond with PVC foil. Which should last for 20 to 25 years. But I found that there are also options using clay, concrete and even just compacting the soil. Compacting your soil to an extend that it can hold water is highly depended on the composition of your soil (I would say the higher clay percentage the better it would work). It would definitely not have worked for us, because we have very sandy soil. So I decided to buy a PVC liner of 1mm thickness.
Before you start digging, think about where to put the dug out soil You can try to calculate how much it will be and find a place to put it (if your property is big enough), or find out where to get rid of it. Living in a big city, getting rid of extra sand is a question of organisation. It costs money to get rid of it at recycling places. When it is good soil that you dig out you can try to give it away to people via networks like ebay. In Germany there is one platform to exchange soil countrywide. It is this on here: http://www.abfallberatung.de/boden/daten.asp.
I tried to buy the foil lining for the pond before digging it. I calculated the measurements I would need. The clever man at the garden centre though would not sell any foil to me unless I dug out the whole pond and then measured the length, depth and wide with a rope. He was damn right. I suggest you to not buy any liner before you are ready with the digging. So if you planned the size it´s time to start digging.
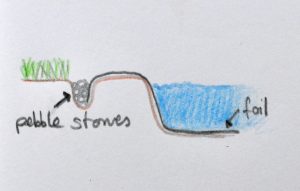
Around the pond there needs to be a capillary barrier that keeps grass and other plants from sucking the water out of the pond. A capillary barrier can be a very small trench around the pond where the foil ends in pebble stones.
Phase 2. Digging the pond.
The material needed for digging the pond: obviously shovels, a wheel barrel, a saw if there are roots in the way and a pickaxe for stony areas. If you find different layers of soil, for example sand and topsoil, try to separate them while digging. We did not do it and so the good top soil got totally mixed up with the sand layer. Which made it more complicated to give the soil away or find good use for it. So divide if you can.
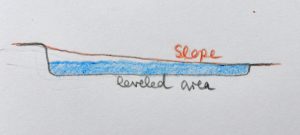
Try to level the different layers of the pond using a water-level. In our case, the place where the pond should later be had a slight slope, so we definitly needed the water-level.
And as I wrote before. While digging try to just simultaneously take care of the dug out material. Either find a good place to put it or rent a waste container for this purpose (living in a city with limited space it´s an expensive but easy way to handle the material). We put all the dug out material (mixing the top soil and the sand) on the grass next to the pond. This meant to move every wheel barrel at least one more time and all the grass under the big heap died. It´s not a big problem, but it could be avoided.
Now also dig the capillary barrier around the pond.
Phase 3: Buying the liner and lining the pond
When you are ready with digging the pond, the measuring work can begin. The store where I bought the foil suggested me to take a rope and lay it in the longest direction through the pond, so it would touch the ground completely. You begin and end where the capillary barrier is. And then you also measure the widest direction. Add 60cm on both for the borders and as a backup and you got you lining size. In our case we measured 7.4 m and 5,4 m, which made our lining 8 m x 6 m big.

In stores where you can buy liner for the pond, they usually also sell you fleece to put under the foil. We decided against this layer, because it costs almost the same amount as the foil. It is important to make sure there are no stones or broken roots under the foil, that could damage it. We gathered all the stones, cut the small roots and then used old plastic material and sieved sand to cover the ground of the pond.
Now if you think you can do the lining of the pond alone, you can´t. The foil is so heavy that for our size at least we needed three persons to move it. It must have weight about 100 kg. It is recommended to lay the PVC foil in the sun before use, because the heat makes it a little softer and easier to work with. When lining the pond it is useful to make clever use of the folding direction of the inter folded foil. We unfolded the foil step by step into the pond. Then tried to make it fit with as little crinkles as possible (it´s not avoidable in the end).
The next step is to cut the foil and make it fit into the capillary barrier.
You can put water in the pond now 🙂 It should stay there…
Phase 4: Taking care of the banks of the pond
This phase may seem unnecessary, but it is not. Now that the pond is almost ready you may see a lot of black foil. That is at least what we saw here. The foil is not UV-resistant, which means it breaks over time, when exposed to direct sunlight. So covering the lining that is visible when the pond is filled with water is necessary. We bought a „shore mat“, a green, fluffy mat for plants to grow on that covers the banks of the pond now. We additionally used stones to cover the bank. The shore mat is ending together with the foil in the capillary barrier. Now it´s also the best time to put the pebble stones in the capillary barrier. On top of the shore mat, between water and capillary barrier, we put old bricks a friend gave us for free.

Phase 5: Planting in the pond
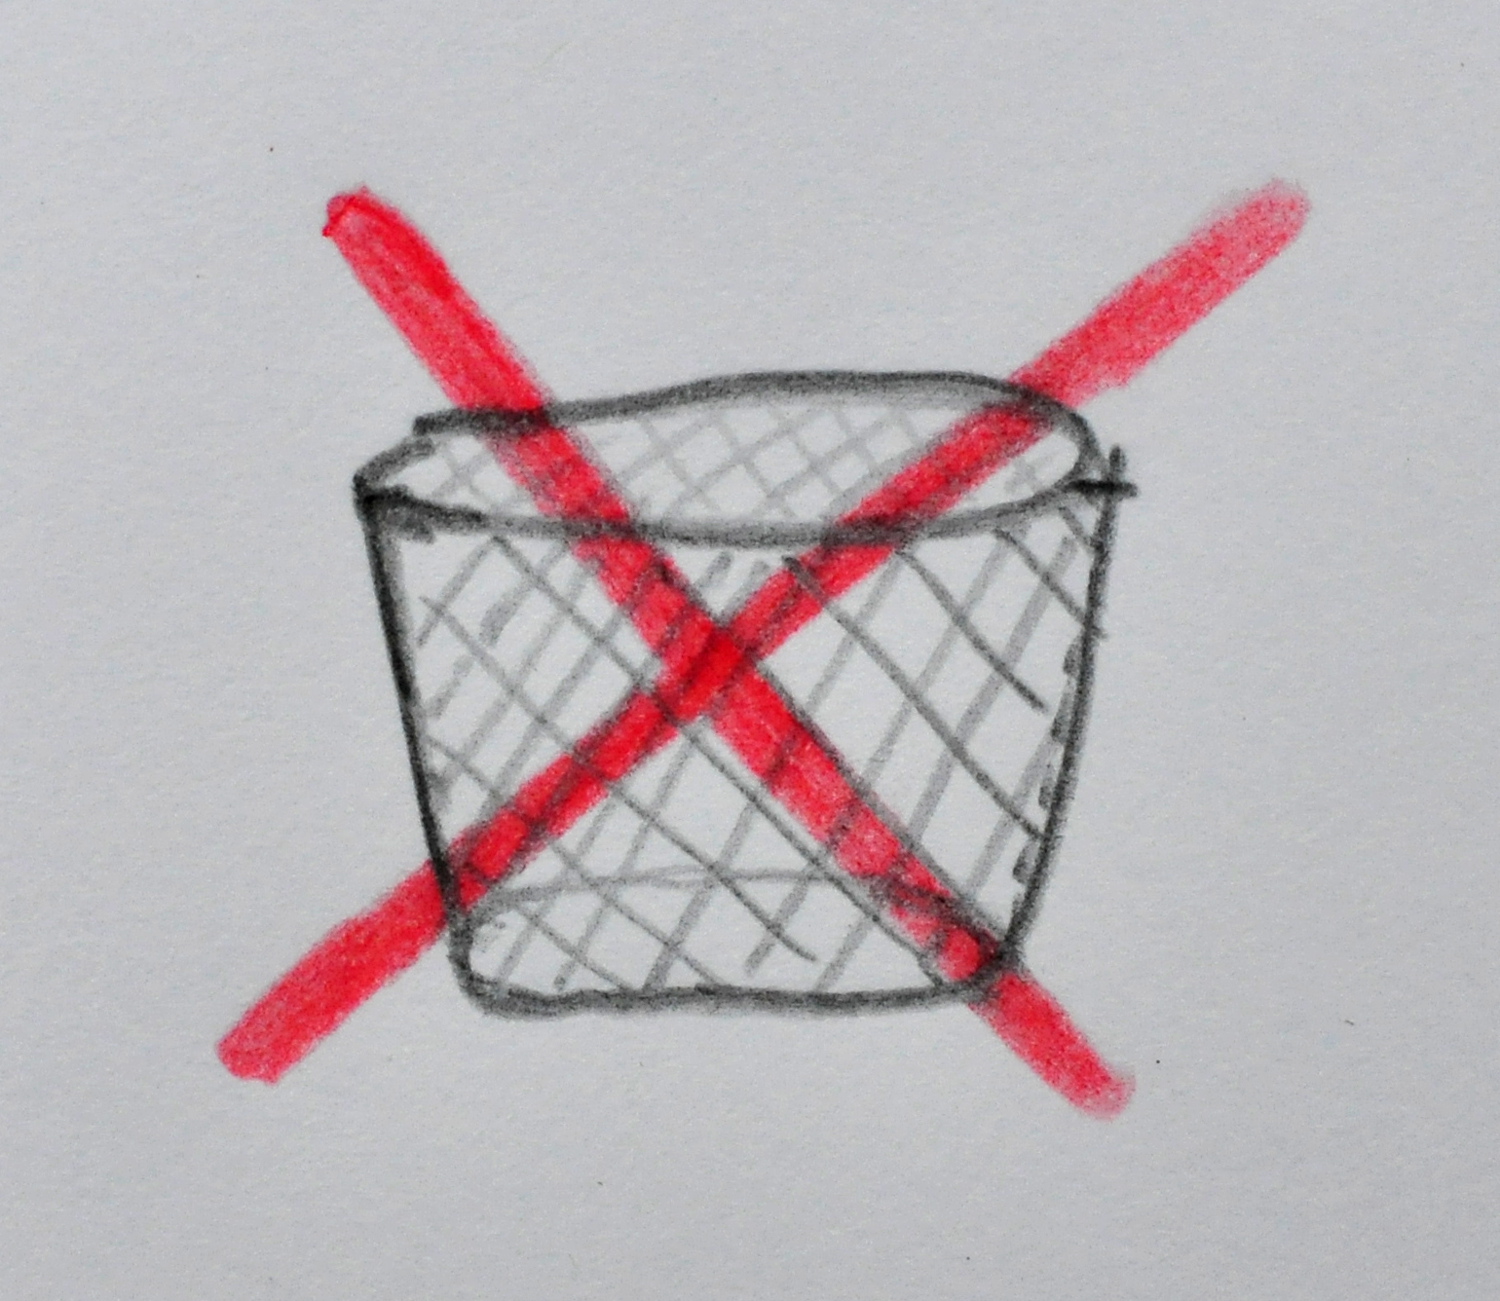
I am not a pond plants expert. Just that you know. But one thing we did differently than the pond plant sellers would tell us was to not use any soil. In the stores you can buy soil for ponds and they recommend you to use it. But I spoke to a permaculture garden planner who I highly trusted and he said literally „never put any soil in any pond„. His argument was that the soil will develop over time, through fallen leaves, particles and so on. He suggested me to use stones to fixate the plants in their spots. Another very interesting thing he told me was that these plastic net pots have absolutely no use. You can buy them to plant the plants in these pots in the pond. But he said whenever he would clean a pond after a few years, he would find these pots swimming around everywhere. So what we did is just put the plants in the pond, using pebble stones to fixate them in their spots and save some plastic use this way. Until now (around six weeks after planting) the plants are alive and healthy looking. So far I can recommend this technique. But it has not been a complete season. So I can only tell you what I observed till now.
Reflections
Looking back I thought about how the pond could have been „more permaculture“. Let´s see. It´s a tricky question. The shape of the pond is beautiful, but fancy and resulted in a higher amount of foil off cuts. If the shape would have been more round there would have been less off cuts. That is a point I will consider next time. Okay, second thing that instantly comes to my mind is: what about all the plastic? Is having a pond this size worth the amount of PVC foil that is now part of the garden? I would say, well it was our only option as other foil was too expensive and I did not want to use concrete, nor clay. Another option would have been to just use an old bathtub filled with water and plants as a beauty spot. But there is also the amount of habitat that we created and additionally the water catchment area and the pond as a thermal mass. How to decide? I would say due to all the advantages and the increase of wild life it is worth it. Next time I might go for different sealing options though.